How to create simple image slider using bootstrap carousel in Drupal

Image sliders are essential requirement of all websites. There are contributed modules for image sliders, view slide show is one among them. you can read more about views slide show here.
another module is slick (https://www.drupal.org/project/slick)
one of the draw back of these modules is difficulties facing during customizations. For example if you want to customize text on each slide with different html tags for each slider , it will be difficult while using these modules. Here we are going to create an image slider without any modules.
Here we are going to create image slider using carousel.js in bootstrap. We will be creating backend content type, using which administrators can manage images and text in slider. We will create a view in order to render images and text.
We are doing this in below steps
- Create hero Slider content type
- Create a view with block display
- Assign slider block to region
- Customizing view template
Here we are assuming you already got bootstrap sub theme and you have a Bootstrap 3 base theme (https://www.drupal.org/project/bootstrap)
You can see a sample sub theme in above base theme. Enable this as default theme of your site.
Download bootstrap from (https://getbootstrap.com/docs/3.4/getting-started/) and place bootstrap folder in your subtheme folder.
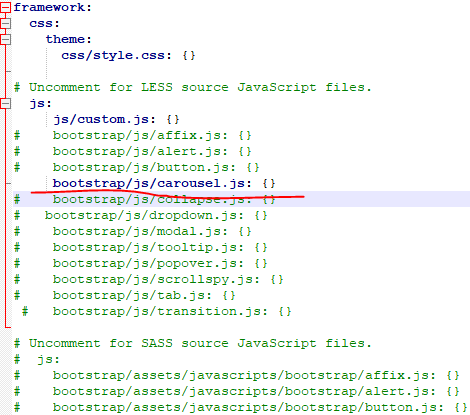
Make sure below js file enabled in libraries.yml. here I am using less version of bootstrap.
Next we are going through below steps.
Step 1 – Create Hero Slider content type
Here we have created a content type hero slider and adding image.
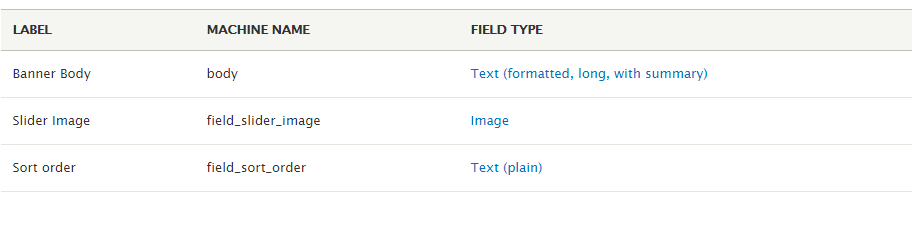
Banner body is the text on image and slider image is the individual image on slider. Sort order is used for ordering images in the slider.
Step 2- create a view with block display
Next, go to views under structure.
http://yourdomain.com/admin/structure/views
here we are creating a view named hero_slider which has a block display.
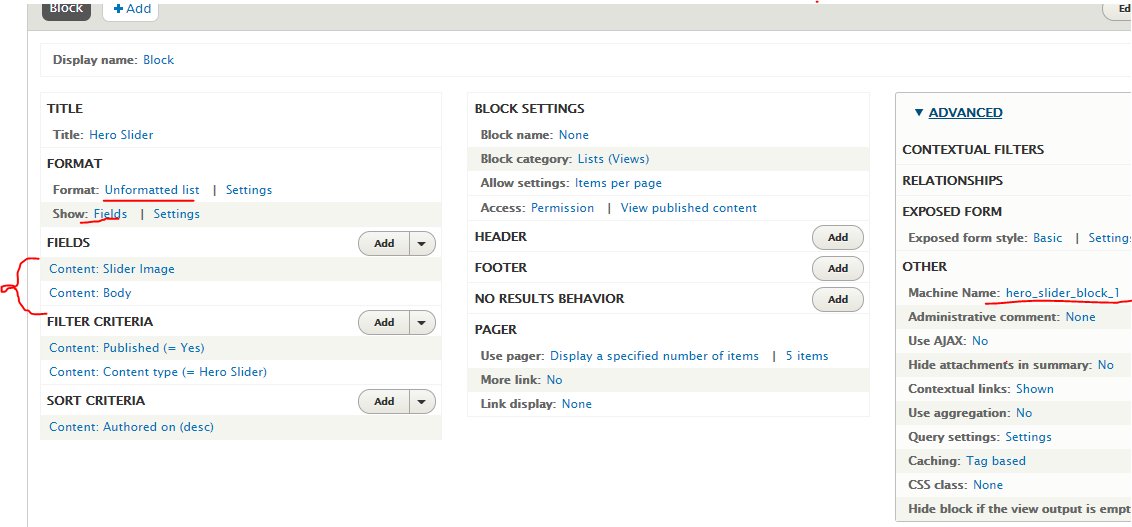
Show fields in display and add slider image field and body field. Also confirm format as unformatted list.
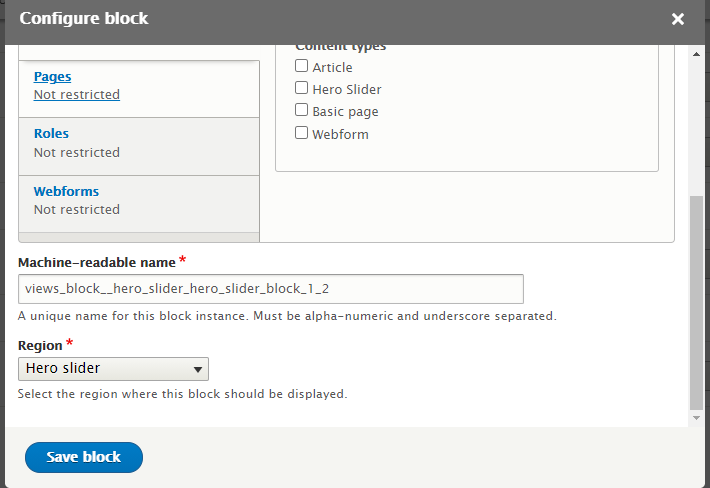
Here machine name of view block is hero_slider_block_1
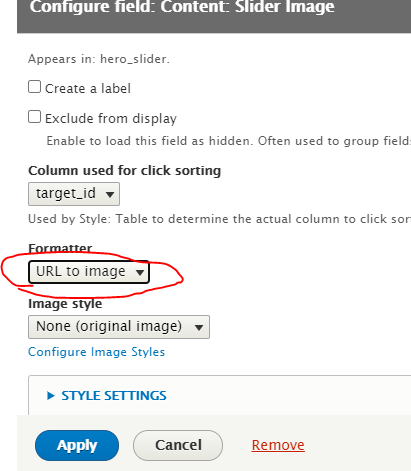
Also for slider image, field select formatter as URL to image as shown below.
Step 3 – Assign slider block to region
As Next step, assign view block that we created in to a region in our front page
First, we will create region in YOUR_THEME.info.yml
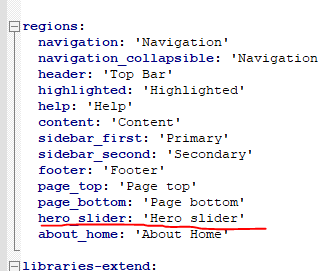
Here I created a Hero Slider region in info file. Then print this region in twig template.
We have below front page template.
C:\xampp\htdocs\YOUR-PROJECT\themes\custom\YOUR_THEME\templates\system\page–front.html.twig
Just after header tag we are printing our hero slider region.

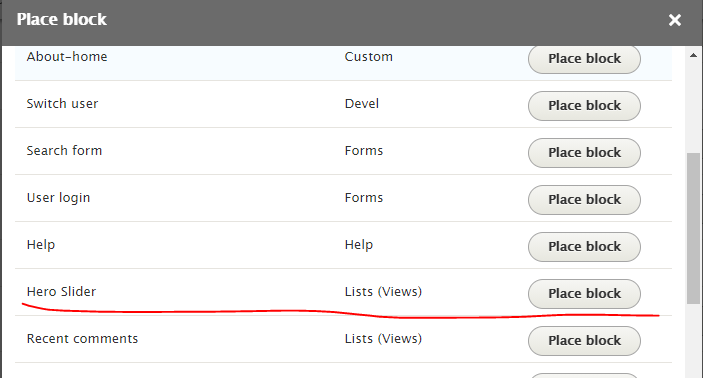
Flesh the cache and go to block layout page under structure.

As shown above click on place block button and select your block and click place block button again as below.
Then select region as below and unselect Display title check box.
Then clear cache.
Now if you add content for hero slider content type, you can see the image URL and html body content in your front page. But not in a slider form.
Step-4 Customizing view template
Next, we have to make view block in to a slider.
For this first we need to override existing hero slider view block. Our view block mechine name is hero_slider_block_1. So our template will be views-view-unformatted–hero_slider–hero_slider_block_1.html.twig
You can read more about view templates here.
Below provided a sample slider using Bootstrap.
<div id="slider4" class="carousel slide mb-5" data-ride="carousel">
          <ol class="carousel-indicators">
            <li class="active" data-target="#slider4" data-slide-to="0"></li>
            <li data-target="#slider4" data-slide-to="1"></li>
            <li data-target="#slider4" data-slide-to="2"></li>
          </ol>
          <div class="carousel-inner">
            <div class="carousel-item active">
              <img class="d-block img-fluid" src="https://source.unsplash.com/wgq4eit198Q/700x400" alt="First Slide">
              <div class="carousel-caption d-none d-md-block">
                <h3>Slide One</h3>
                <p>Lorem ipsum dolor sit amet consectetur adipisicing elit. Possimus, illo?</p>
              </div>
            </div>
            <div class="carousel-item">
              <img class="d-block img-fluid" src="https://source.unsplash.com/WLUHO9A_xik/700x400" alt="Second Slide">
              <div class="carousel-caption d-none d-md-block">
                <h3>Slide Two</h3>
                <p>Lorem ipsum dolor sit amet consectetur adipisicing elit. Possimus, illo?</p>
              </div>
            </div>
            <div class="carousel-item">
              <img class="d-block img-fluid" src="https://source.unsplash.com/4yta6mU66dE/700x400" alt="Third Slide">
              <div class="carousel-caption d-none d-md-block">
                <h3>Slide Three</h3>
                <p>Lorem ipsum dolor sit amet consectetur adipisicing elit. Possimus, illo?</p>
              </div>
            </div>
          </div>

          <!-- CONTROLS -->
          <a href="#slider4" class="carousel-control-prev" data-slide="prev">
            <span class="carousel-control-prev-icon"></span>
          </a>

          <a href="#slider4" class="carousel-control-next" data-slide="next">
            <span class="carousel-control-next-icon"></span>
          </a>
        </div>
Also we need to apply below java script in order to work the slider.
$('.carousel').carousel({
      interval: 3000,
      keyboard: true,
      pause: 'hover',
      wrap: true
    });
So here we are going override our view block with carousel elements and fields from the view.
So our final content of file views-view-unformatted–hero_slider–hero_slider_block_1.html.twig
Will be as below.
{#
/**
 * @file
 * Default theme implementation to display a view of unformatted rows.
 *
 * Available variables:
 * - title: The title of this group of rows. May be empty.
 * - rows: A list of the view's row items.
 *   - attributes: The row's HTML attributes.
 *   - content: The row's content.
 * - view: The view object.
 * - default_row_class: A flag indicating whether default classes should be
 *   used on rows.
 *
 * @see template_preprocess_views_view_unformatted()
 *
 * @ingroup themeable
 */
#}

 <div class="carosel-div">
	<div id="slider4" class="carousel slide mb-5" data-ride="carousel">
  <ol class="carousel-indicators">
	<li class="active" data-target="#slider4" data-slide-to="0"></li>
	<li data-target="#slider4" data-slide-to="1"></li>
	<li data-target="#slider4" data-slide-to="2"></li>
  </ol>
  <div class="carousel-inner">

{% for key,row in rows %}
  {%
    set row_classes = [
      default_row_class ? 'views-row',
	  'nadee'
    ]
  %}


  {% if key == 0 %}
  <div class="item active">
  {% else %}
   <div class="item">

  {% endif %}

              <img class="d-block img-fluid" src="{{file_url(row.content['#row']._entity.field_slider_image.entity.uri.value)}}" alt="First Slide">
              <div class="carousel-caption d-none d-md-block">
							<div class="card bg-primary text-white h-100 p-3">
						<div class="card-body">
						  {{row.content['#row']._entity.body.value|raw }}

						</div>
					</div>
              </div>
            </div>

{% endfor %}

<a href="#slider4" class="carousel-control-prev" data-slide="prev">
            <span class="carousel-control-prev-icon"></span>
          </a>

          <a href="#slider4" class="carousel-control-next" data-slide="next">
            <span class="carousel-control-next-icon"></span>
          </a>
        </div>
        </div> {# ----carousel end div #}
Please note ,below lines are printing image and body fields respectively.
{{file_url(row.content[‘#row’]._entity.field_slider_image.entity.uri.value)}}
{{row.content[‘#row’]._entity.body.value|raw }}
add below script in your java script file.
(function ($,jQuery) {
  $(document).ready(function(){
  $('.carousel').carousel({
      interval: 3000,
      keyboard: true,
      pause: 'hover',
      wrap: true
    });

    $('#slider4').on('slide.bs.carousel', function () {
      console.log('SLIDE!');
    });

    $('#slider4').on('slid.bs.carousel', function () {
      console.log('SLID!');
    });


  });
})(jQuery);
Flush the cache you can see The slider with caption on the slider image.