How to Create Custom field in Drupal 9
Here we are going to create a custom field and that can be used as a field in content types.
Here we are using color jquery farbtastic jquery plugin for creating a color picker wheel, upon selecting color, hexa color code will be loaded in a text box. select ed color will be displayed in the node page.
https://acko.net/blog/farbtastic-jquery-color-picker-plug-in/
we will be following below steps for creating custom field,
- Create Field Type
- Create Field Widget
- Create Field Formatter
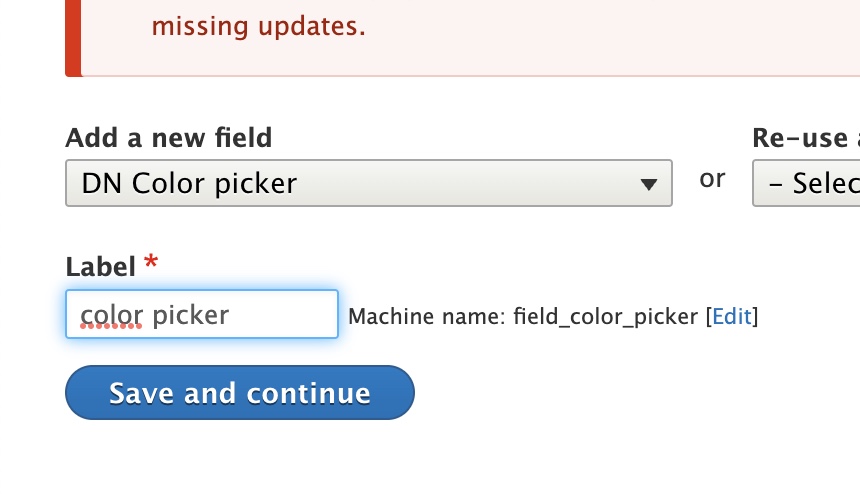
Upon implementation you can add a custom color picker field as below in manage field.
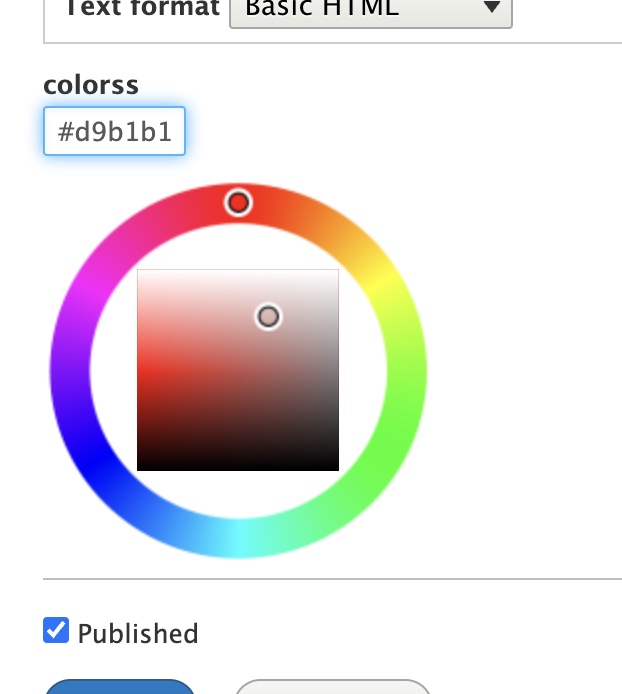
And you can pick the color as below while adding content while click on color textbox.
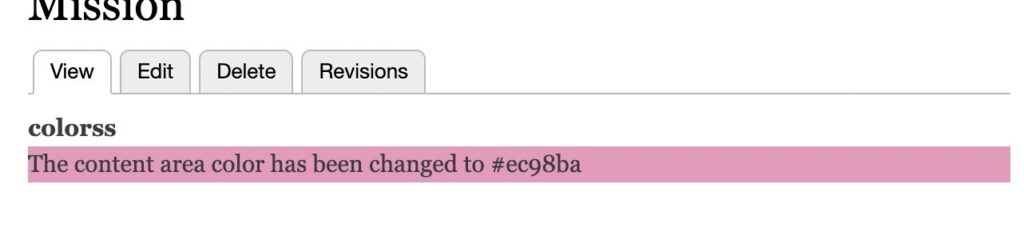
So selected color will be displayed as below.
Also in the manage display tab of content type you can see our newly created field widget in the widget option of new field.
For achieving this we have to create below folders and files in your custom module.
/src/Plugin/Field/FieldFormatter/ColorBackgroudFormatter.php
/src/Plugin/Field/FieldType/ColorPickerItem.php
/src/Plugin/Field/FieldWidget/ColorPickerWidget.php
/src/Plugin/Field/FieldWidget/TextWidget.php
We are going to explain how we are creating each file and purpose of each file.
Below provided are the main steps involving creating this color picker custom field.
Field types, Field formatter and FiledWidget are treated as plugins which uses plugin API’s, So we have to place all these class files in custom module path /src/Plugin/Field/
Step 1- Create Field Type
As a first step we are going to create a field type , which provides details like properties and behavior of the custom fields,
So here we are going to create ColorPickerItem class, a field type class in below path
/src/Plugin/Field/FieldType/ColorPickerItem.php
Use below name space, here dn_field is our custom module
namespace Drupal\dn_field\Plugin\Field\FieldType;
Import below as we have to override functions.
use Drupal\Core\Field\FieldItemBase;
use Drupal\Core\Field\FieldStorageDefinitionInterface;
use Drupal\Core\TypedData\DataDefinition;
Below Field type is very important which is used to create the custom field.
/**
* Plugin implementation of the 'dn_field' field type.
*
* @FieldType(
*   id = "field_dn_color_picker",
*   label = @Translation("DN Color picker"),
*   module = "dn_field",
*   description = @Translation("Demonstrates a field composed of an RGB color."),
*   default_widget = "field_colorpicker",
*   default_formatter = "field_sample_color_background"
* )
*/
Id is the machine name of our custom field
Label – label of our custom field which will be shown admin pages for identifying our custom field.
Module – our custom module name.
default_widget & default_formatter – id of formatter and widget that we are going to create in next steps.
Extend class with FieldItemBase.
class ColorPickerItem extends FieldItemBase{Below we are going to override the schema and propertyDefinitions functions.
So in schema function we will define how the value stored in database, since we have only one text field in our custom field, return an array with a single column of type text.
public static function schema(FieldStorageDefinitionInterface $field_definition) {
   return [
     'columns' => [
       'value' => [
         'type' => 'text',
         'size' => 'tiny',
         'not null' => FALSE,
       ],
     ],
   ];
 }
Create an isEmpty function to store default value if text field is empty and set label in propertyDefinitions function as below.
/**
  * {@inheritdoc}
  */
 public function isEmpty() {
   $value = $this->get('value')->getValue();
   return $value === NULL || $value === '';
 }

 /**
  * {@inheritdoc}
  */
 public static function propertyDefinitions(FieldStorageDefinitionInterface $field_definition) {
   $properties['value'] = DataDefinition::create('string')
     ->setLabel(t('Hex value'));

   return $properties;
 }
You can see the full source code of the field type class here.
Step 2- Create Field Widget
Here we are going to create front end widgets for our custom field.
Create the directory in your custom module /src/Plugin/Field/FieldWidget
So here, in our example we need one text field where user click on this field we have to show color picker using jquery farbtastic library and on selecting color we have to populate the text field with the selected color’s hexa code.
So first we will create a TextWidget class which will extend WidgetBase class.
/src/Plugin/Field/FieldWidget/TextWidget.php
So here we will be implementing formElement function in order to return form text field,
So in TextWidget.php include namespace other libraries as below.
namespace Drupal\dn_field\Plugin\Field\FieldWidget;

use Drupal\Component\Utility\Color;
use Drupal\Core\Field\FieldItemListInterface;
use Drupal\Core\Field\WidgetBase;
use Drupal\Core\Form\FormStateInterface;
Add below annotation before starting the class. Here we have to provide id of this text widget and in field types array, provide id of field type that we created in previous step. So here it is field_dn_color_picker.
/**
* Plugin implementation of the 'field_example_text' widget.
*
* @FieldWidget(
*   id = "field_example_text",
*   module = "dn_field",
*   label = @Translation("RGB value as #ffffff"),
*   field_types = {
*     "field_dn_color_picker"
*   }
* )
*/
class TextWidget extends WidgetBase {
So below element is the text box element that will be showing in Add content page.
/**
  * {@inheritdoc}
  */
 public function formElement(FieldItemListInterface $items, $delta, array $element, array &$form, FormStateInterface $form_state) {
   $value = isset($items[$delta]->value) ? $items[$delta]->value : '';
   $element += [
     '#type' => 'textfield',
     '#default_value' => $value,
     '#size' => 7,
     '#maxlength' => 7,
     '#element_validate' => [
       [$this, 'validate'],
     ],
   ];
   return ['value' => $element];
 }
Additionally we are adding validate function.
/**
  * Validate the color text field.
  */
 public function validate($element, FormStateInterface $form_state) {
   $value = $element['#value'];
   if (strlen($value) === 0) {
     $form_state->setValueForElement($element, '');
     return;
   }
   if (!Color::validateHex($value)) {
     $form_state->setError($element, $this->t('Color must be a 3- or 6-digit hexadecimal value, suitable for CSS.'));
   }
 }
So in same folder we have to create another widget which will append div tags to above text widget so that we can show color picker in those div tags,
/src/Plugin/Field/FieldWidget/ColorPickerWidget.php
In this file, again we are starting with field widget annotation as below with different id,
namespace Drupal\dn_field\Plugin\Field\FieldWidget;

use Drupal\Core\Field\FieldItemListInterface;
use Drupal\Core\Form\FormStateInterface;

/**
* Plugin implementation of the 'field_example_colorpicker' widget.
*
* @FieldWidget(
*   id = "field_colorpicker",
*   module = "dn_field",
*   label = @Translation("Color Picker"),
*   field_types = {
*     "field_dn_color_picker"
*   }
* )
*/
Next, extend this class with TextWidget class that we created previously.
class ColorPickerWidget extends TextWidget {So here in formElement function we are appending div tags required, also we are loading libraries required.
public function formElement(FieldItemListInterface $items, $delta, array $element, array &$form, FormStateInterface $form_state) {
   //echo "dhggg";exit;
   $element = parent::formElement($items, $delta, $element, $form, $form_state);
   $element['value'] += [
     '#suffix' => '<div class="field-example-colorpicker"></div>',
     '#attributes' => ['class' => ['edit-field-example-colorpicker']],
     '#attached' => [
       // Add Farbtastic color picker and javascript file to trigger the
       // colorpicker.
       'library' => [
         'core/jquery.farbtastic',
         'dn_field/colorpicker',
       ],
     ],
   ];


   return $element;
 }
Here core/jquery.farbtastic is the farbtastic jquery plugin available in drupal core.
dn_field/colorpicker is the custom js file in our custom module.
We are creating the below js file for handling click event on color picker.
/js/field_color.js
Content of this js file is as below.
(function ($) {
 console.log("Inside attach");
 'use strict';

 Drupal.behaviors.field_example_colorpicker = {
   attach: function () {
     console.log("Inside attach");
     $('.edit-field-example-colorpicker').on('focus', function (event) {
       var edit_field = this;
       var picker = $(this).closest('div').parent().find('.field-example-colorpicker');
       // Hide all color pickers except this one.
       $('.field-example-colorpicker').hide();
       $(picker).show();
       $.farbtastic(picker, function (color) {
         edit_field.value = color;
       }).setColor(edit_field.value);
     });
   }
 };
})(jQuery);
So above script show the color picker while click on text box. Also on selecting the color, selected color will be loaded in text box
Create file dn_field.libraries.yml in your custom module with below entry.
colorpicker:
 version: 1.x
 js:
   js/field_color.js: {}
Step 3 – Create Field Formatter
As a last step, we have to decide how to display the custom field while viewing the content, in below file we can provide how this new custom field data displayed to the user.
/src/Plugin/Field/FieldFormatter/ColorBackgroudFormatter.php
Start class with below name space and annotations.
namespace Drupal\dn_field\Plugin\Field\FieldFormatter;

use Drupal\Core\Field\FormatterBase;
use Drupal\Core\Field\FieldItemListInterface;

/**
* Plugin implementation of the 'field_example_color_background' formatter.
*
* @FieldFormatter(
*   id = "field_sample_color_background",
*   label = @Translation("Change the background of the output text"),
*   field_types = {
*     "field_dn_color_picker"
*   }
* )
*/
class ColorBackgroudFormatter extends FormatterBase {
Here id is the unique id of our field formatter. Field type is the field type id that we created in first step. Extend the class with FormatterBase.
Override the viewElements function as below, we are creating html p tag with selected color code.
public function viewElements(FieldItemListInterface $items, $langcode) {
   $elements = [];

   foreach ($items as $delta => $item) {
     $elements[$delta] = [
       '#type' => 'html_tag',
       '#tag' => 'p',
       '#value' => $this->t('The content area color has been changed to @code', ['@code' => $item->value]),
       '#attributes' => [
         'style' => 'background-color: ' . $item->value,
       ],
     ];
   }
   return $elements;
 }
Clear the cache, you can see newly created field while adding fields in content types.
Download complete code here.