How to create a custom form and submit data in to database in Drupal 8 and 9
In this article we are discussing about steps required to create a custom form. Here we are creating a custom form in our custom module with validations and submit data in to a custom table.
So after applying below changes you can a see a custom form as below which will save data in to the table students.

Assume dn_students is our custom module. Follow below 3 steps of implementation in this custom module.
Step1 – Create table schema in *.install file
Create a dn_students.install file in your module root folder path and place below code.
<?php
use Drupal\Core\Database\Database;

/**
 * Implements hook_schema().
 */
function dn_students_schema(){
    $schema['students'] = array(
        'description' => 'The table for storing the students data.',
        'fields' => array(
            'id' => array(
                'description' => 'The primary identifier for student',
                'type' => 'serial',
                'not null' => TRUE,
                'unsigned' => TRUE,
            ),
            'fname' => array(
                'description' => 'Student name',
                'type' => 'varchar',
                'length' => 255,
                'not null' => TRUE,
                'default' => '',
            ),
           'sname' => array(
                'description' => 'Student second name.',
                'type' => 'varchar',
                'length' => 255,
                'not null' => TRUE,
                'default' => '',
            ),
            'age' => array(
                'description' => 'Age of student',
                'type' => 'int',
                'length' => 100,
                'not null' => TRUE,

            ),
            'marks' => array(
                'description' => 'Mark of student',
                'type' => 'int',
                'length' => 100,
                'not null' => TRUE,
            ),
        ),
        'primary key' => array('id'),
    );
    return $schema;
}
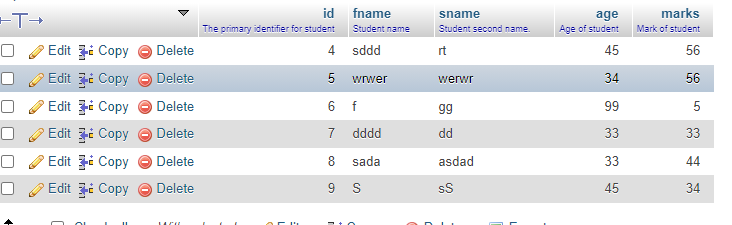
During installation of dn_students module, students table will be created in your database with fields fname, lname , id, age and marks.
Step 2 – Create page path and form mapping in *.routing.yml
Add below code in dn_students.routing.yml
dn_students.add_student:
  path: '/students/add'
  defaults:
    _title: 'Add Students'
    _form: '\Drupal\dn_students\Form\StudentForm'
  requirements:
    _access: 'TRUE'
So, our form page URL is http://yourdomain/students/add
Next, we have to create form php file.
Step 3 – Create a form php file in path /src/Form
Create StudentForm.php file in module path /src/Form
This file has three functions ,
- BuildForm function for bulding form elements
- ValidateForm function for validating form values
- submitForm function for handing form data insertion to database.
See below full code in StudentForm.php.
<?php

namespace Drupal\dn_students\Form;

use Drupal\Core\Form\FormBase;
use Drupal\Core\Form\FormStateInterface;
use Drupal\Core\Database\Database;
use Drupal\Core\Url;
use Drupal\Core\Routing;

/**
 * Provides the form for adding countries.
 */
class StudentForm extends FormBase {

  /**
   * {@inheritdoc}
   */
  public function getFormId() {
    return 'dn_student_form';
  }

  /**
   * {@inheritdoc}
   */
  public function buildForm(array $form, FormStateInterface $form_state) {


    $form['fname'] = [
      '#type' => 'textfield',
      '#title' => $this->t('First Name'),
      '#required' => TRUE,
      '#maxlength' => 20,
      '#default_value' =>  '',
    ];
	 $form['sname'] = [
      '#type' => 'textfield',
      '#title' => $this->t('Second Name'),
      '#required' => TRUE,
      '#maxlength' => 20,
      '#default_value' =>  '',
    ];
	$form['age'] = [
      '#type' => 'textfield',
      '#title' => $this->t('Age'),
      '#required' => TRUE,
      '#maxlength' => 20,
      '#default_value' => '',
    ];
	 $form['marks'] = [
      '#type' => 'textfield',
      '#title' => $this->t('Marks'),
      '#required' => TRUE,
      '#maxlength' => 20,
      '#default_value' => '',
    ];

    $form['actions']['#type'] = 'actions';
    $form['actions']['submit'] = [
      '#type' => 'submit',
      '#button_type' => 'primary',
      '#default_value' => $this->t('Save') ,
    ];

	//$form['#validate'][] = 'studentFormValidate';

    return $form;

  }

   /**
   * {@inheritdoc}
   */
  public function validateForm(array & $form, FormStateInterface $form_state) {
       $field = $form_state->getValues();

		$fields["fname"] = $field['fname'];
		if (!$form_state->getValue('fname') || empty($form_state->getValue('fname'))) {
            $form_state->setErrorByName('fname', $this->t('Provide First Name'));
        }


  }

  /**
   * {@inheritdoc}
   */
  public function submitForm(array & $form, FormStateInterface $form_state) {
	try{
		$conn = Database::getConnection();

		$field = $form_state->getValues();

		$fields["fname"] = $field['fname'];
		$fields["sname"] = $field['sname'];
		$fields["age"] = $field['age'];
		$fields["marks"] = $field['marks'];

		  $conn->insert('students')
			   ->fields($fields)->execute();
		  \Drupal::messenger()->addMessage($this->t('The Student data has been succesfully saved'));

	} catch(Exception $ex){
		\Drupal::logger('dn_students')->error($ex->getMessage());
	}

  }

}
Now install the file and access url /students/add.
You can see submitted details in students table as below.
Download sample module code here.