Drupal Commerce Rest API for checkout process
Here we are going to discuss about Rest web services for checkout process in Drupal commerce.
So here we are achieving this using the Commerce decoupled checkout module.
This module provides end points for Remote orders creation, remote payment creation/initialisation and remote payment capturing/Finalisation.
Install the module with below composer command
$ composer require ‘drupal/commerce_decoupled_checkout:^1.0@beta’
Module available in below link.
https://www.drupal.org/project/commerce_decoupled_checkout
Here we are going to create Rest API’s for below.
- REST API – Create New Order with or without payment
- REST API – Create a new payment for the order with or without payment capture.
- REST API – Capture the existing payment
Here we are using HTTP basic authentication, so make sure your REST Api user has permission below in order to POST request to Rest API endpoints.

REST API – Create New Order with or without payment
After installation of module, navigate in to Rest UI.
/admin/config/services/rest
Enable below resources.
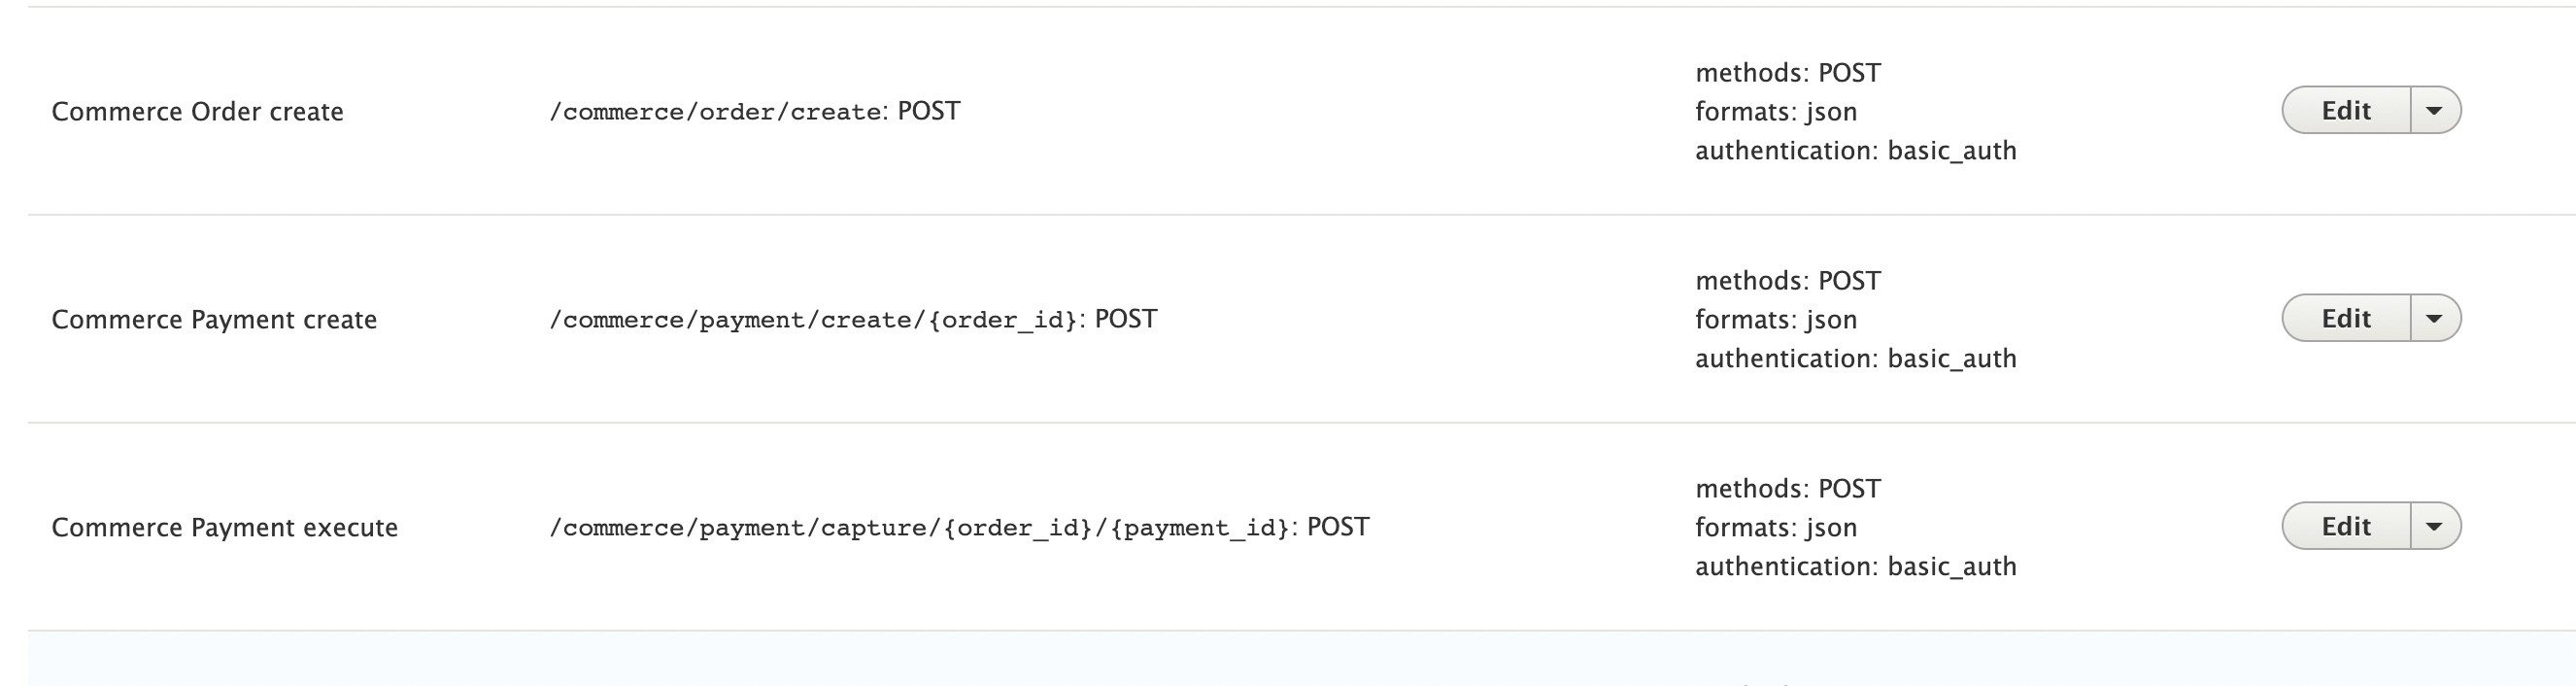
Also make sure below options selected in configurations of each resource.
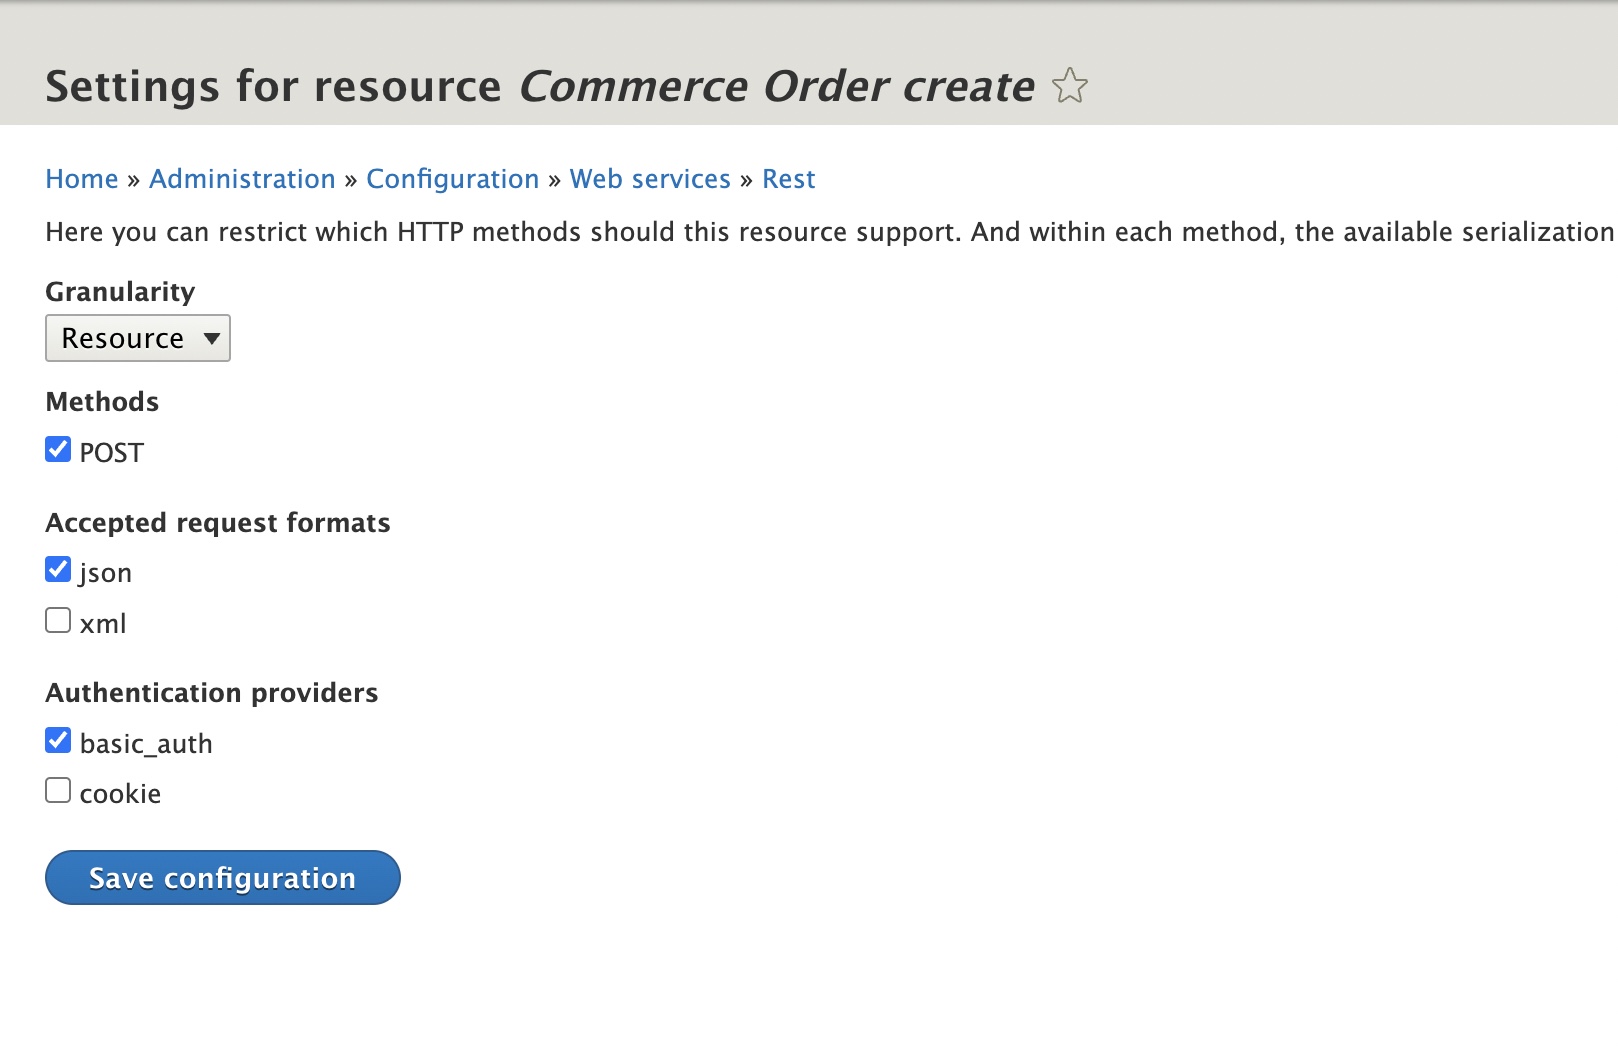
Here we are using basic authentication. You can use cookie authentication also.
For creating order with or without payment, details provided below.
Request URL – http:/ProjectPath/commerce/order/create?_format=json
Request Method- Post
Headers
ContentType – application/json
Response: 201 created response with order details.
Below provides Request body parameters and corresponding attribute documentation.
{
    "order": {
      "type": "default", // optional. Order bundle name. Defaults to "default".
      "email": 'customer@example.com', // optional. Defaults to user email.
      "store": 1, // optional. Store ID. Defaults to the default store in the system.
      "field_name":'value', // optional. Any additional order field value.

      "order_items": [     // optional.
        {
          "type": "default",

           "title": '', // optional, defaults to referenced purchasable entity label.
           "quantity": 1, // optional. Defaults to 1.
           'field_name' => 'value', // optional. Any additional order item field value.
          "purchased_entity": {  // required if order_items is defined.
            "sku": "PRODUCT_SKU"    // required. Product variation SKU.
          },
          "unit_price": { // optional. Only if need to override product price. Defaults to purchased_entity price * quantity.
            "number": 15,  // required if unit_price is defined.
            "currency_code": "EUR", // required if unit_price is defined.
          }
        }
      ],
    },


  // User profile associated with the order.
  "profile": {
      "type":'customer',// optional. Profile bundle name. Defaults to "customer".
      "status": FALSE,   // optional. Activates profile after creation. Defaults to FALSE.
      "field_name":'value'  // optional. Any additional profile field value.
      "field_phone": "88001234567",
      "field_contact_email": 1,
      "field_contact_phone": 0,
      "field_contact_post": 0,
      "field_contact_sms": 0,
      "address": {
        "given_name": "John",
        "family_name": "Snow",
        "country_code": "US",
        "address_line1": "1098 Alta Ave",
        "locality": "Mountain View",
        "administrative_area": "CA",
        "postal_code": "94043"
      }
  },

  // A user account associated with the transaction.
  // Creates a new user if didn't not exist, or uses existing one.
 // In the second case fields WILL NOT be updated.
    "user": {
      "mail" : "test@systemseed.com",// required.
      "name": "Nadeem", // optional. User account name. Defaults to email value.
      "status": FALSE,  // optional. Actives user account after creation. Defaults to FALSE.
      "field_name":"value" // optional. Any additional order field value.
    },

    // If you want to process the payment alongside with order submission,
    // then fill in the details of this field. Otherwise you can skip it
    // and use other REST endpoints to handle payments separately.
    "payment": {
      "gateway": "example_test", // Machine name of the payment gateway added by admin.
      "type": "credit_card",
      "details": {
        "type": "visa",
        "number": "4111111111111111",
        "expiration": {
        "month": "01",
        "year": "2022"
      },
    },
  }
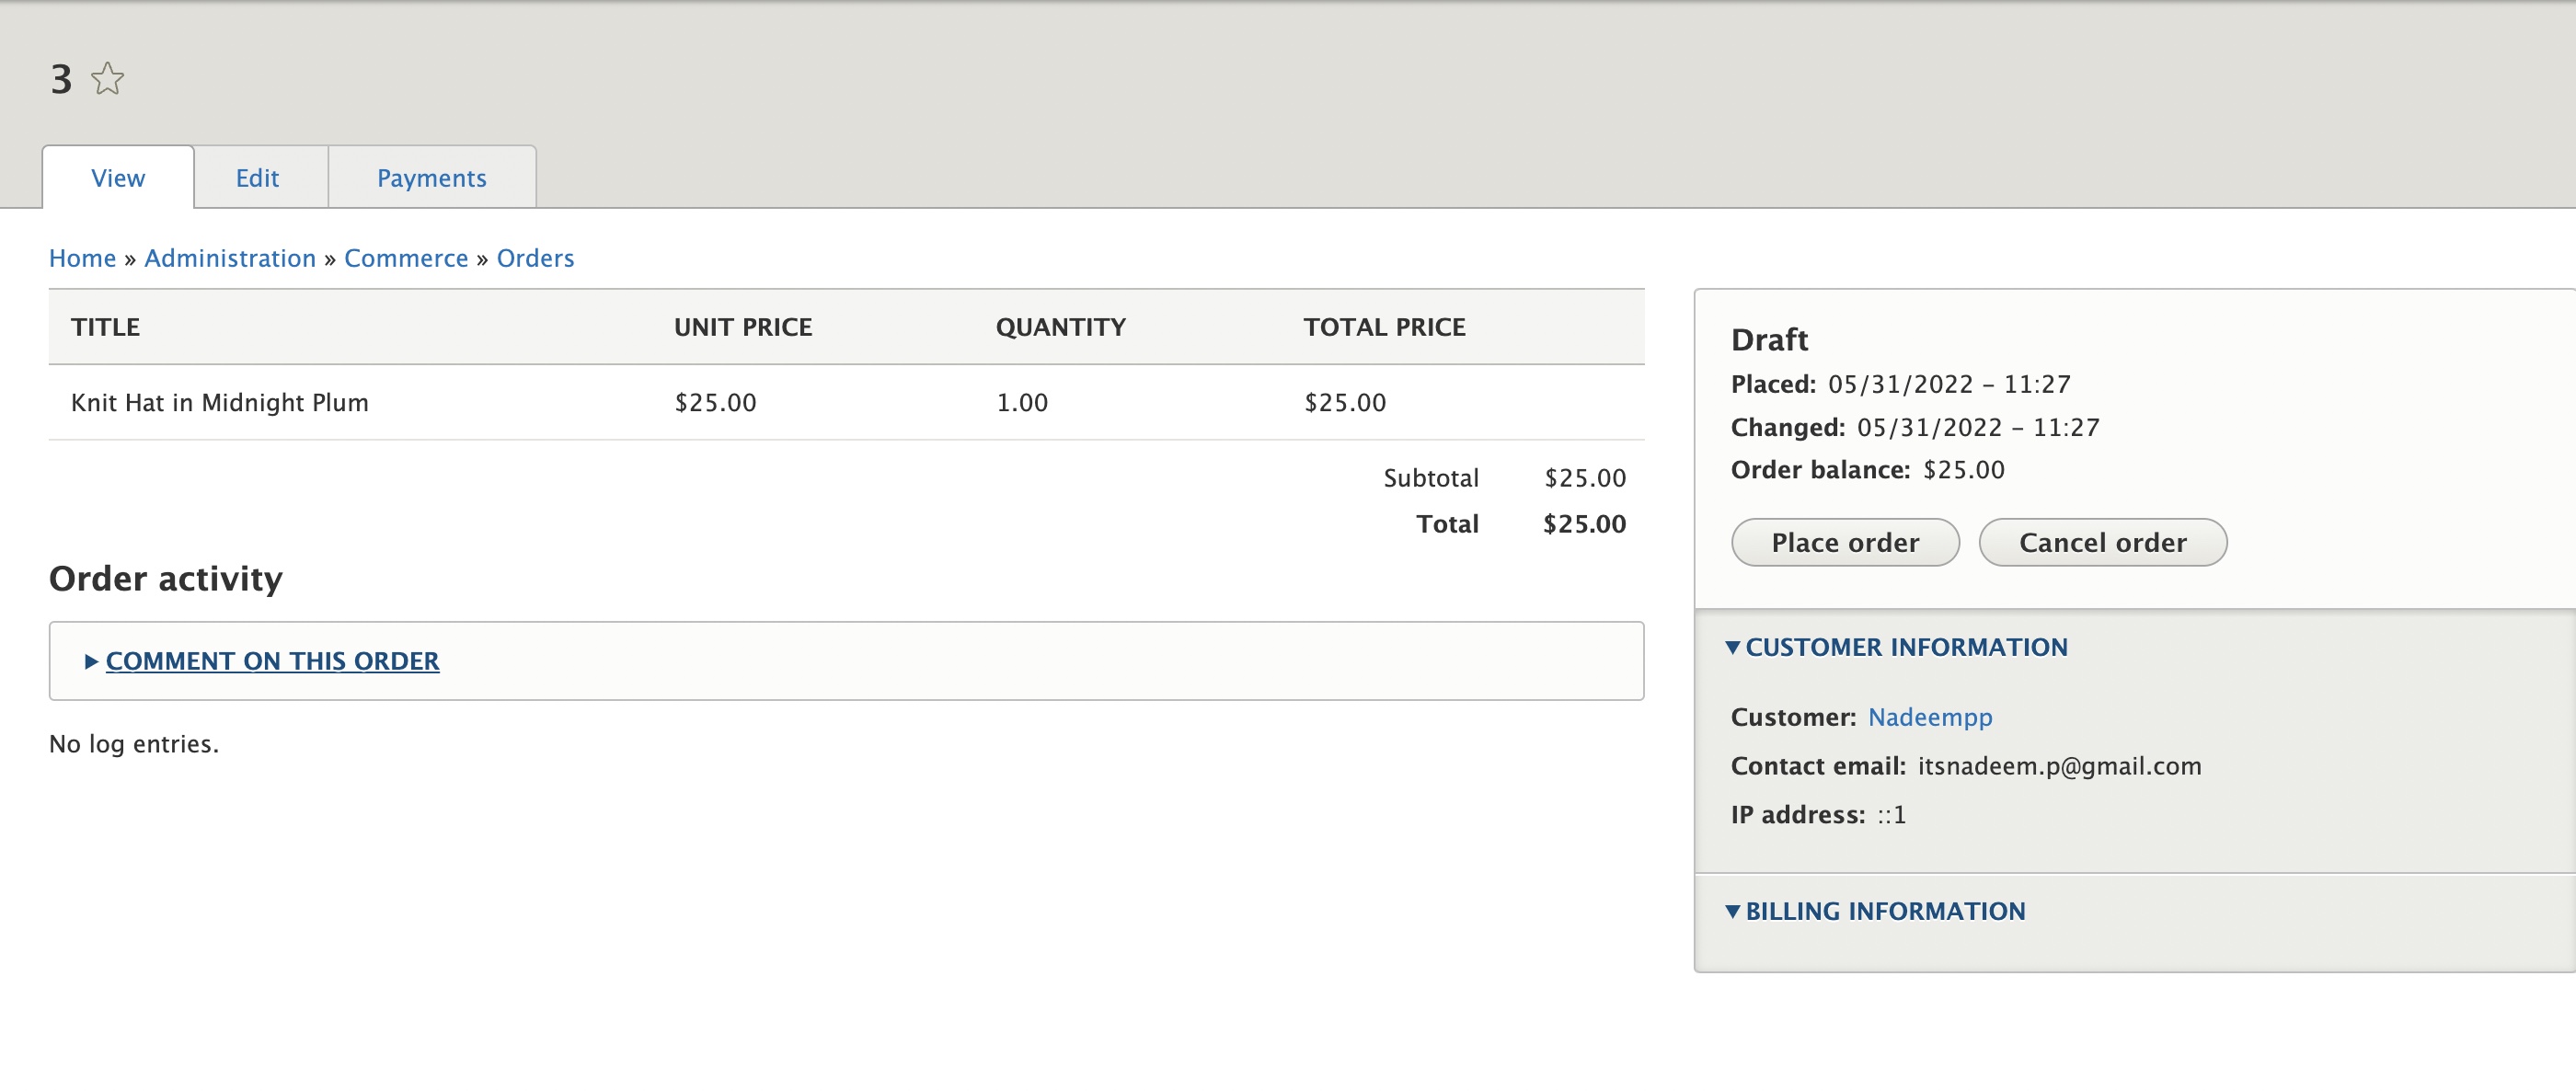
Simple Draft Order Creation
Use below request body for creating a sample order without payment.
{
     "order": {
       "type": "default",
       "email": "itsnadeem.p@gmail.com",
       "store": 1,
       "order_items": [
         {
           "type": "default",

            "title": "Knit Hat in Midnight Plum",
            "quantity": 1,

           "purchased_entity": {
             "sku": "UT-KnitHat-MNPlum"
           },
           "unit_price": {
             "number": 25,
             "currency_code": "USD"
           }
         }
       ]
     },

  "user": {
       "mail" : "itsnadeem.p@gmail.com",
       "name": "Nadeempp",
       "status": "FALSE"
     }
}
So you can see order has been created
Additionally you can provide profile information, that will be considered in Billing information.
"profile": {
       "type":"customer",
       "status": "FALSE",

       "field_phone": "88001234567",
       "field_contact_email": 1,
       "field_contact_phone": 0,
       "field_contact_post": 0,

       "address": {
         "given_name": "John",
         "family_name": "Snow",
         "country_code": "US",
         "address_line1": "1098 Alta Ave",
         "locality": "Mountain View",
         "administrative_area": "CA",
         "postal_code": "94043"
       }

   }
}
You can see below order in Orders list
You can also create orders with payment information. You can get payment gateway information from Commerce>Configuration->Payment->Payment Gateways
So here I have enabled example_credit_card

You can see ID as example_credit_card, this is the gateway for us in request body.
add below additional object in order create request body.
“payment”: {
“gateway”: “example_credit_card”,
“type”: “credit_card”,
“details”: {
“type”: “visa”,
“number”: “4111111111111111”,
“expiration”: {
“month”: “01”,
“year”: “2023”
}
}
}
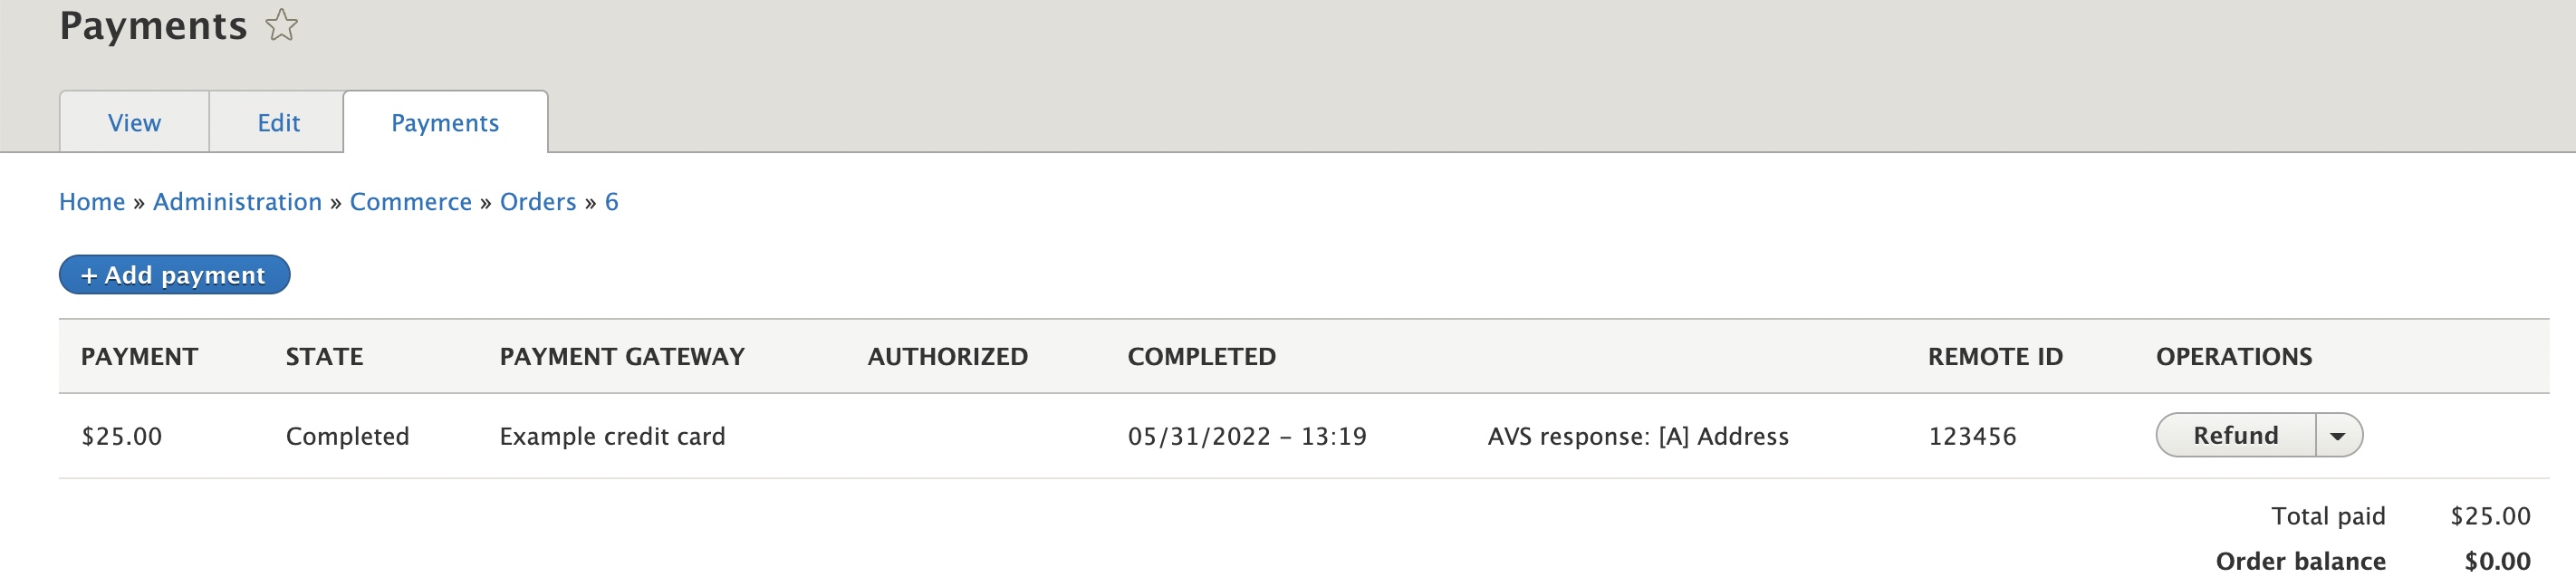
So with above payment parameters , order will be created as completed with payment information in order Payment tab.
REST API – Create a new payment for the order with or without payment capture
Use below in your request
URL- http://yourprojectpath/commerce/payment/create/order_id?_format=json
Order_id – Replace with order id for which you are creating payment,
Request Method- POST
Headers
ContentType – application/json
Request Body
{
“gateway”: “example_credit_card”, // required. Commerce Payment Gateway name.
“type”: “credit_card”, // required. Commerce Payment Type name.
‘capture’ => FALSE, // optional. Defines if the payment has to be finalized.
“details”: { // optional. Payment details associated with the payment.
“type”: “visa”,
“number”: “4111111111111111”,
“expiration”: {
“month”: “01”,
“year”: “2023”
}
}
}
After submission, you can see Payment tab of that particular order populated with payment details.
Here you will receive payment id in response. This payment id needed to capture payment in next step.
REST API – Capture the existing payment
use below in your request
URL-http://yourprojectpath/commerce/payment/capture/order_id/payment_id?_format=json
Request Method- Post
Headers
ContentType – application/json
No Body text
You will receive 200 OK response upon successful submission.
So if you go to that particle order you can see its payment state completed.
So here we have discussed all Rest end points related to checkout process. You can see other related Drupal commerce API articles in below.
Drupal Commerce Rest API – list Products and Product details
Drupal Commerce Rest API configuration and creating API for product categories